Your pathway to healthy food, ethics, beer, and how these things can (and should!) come together in daily life.

Monday, August 1, 2011

Blueberry Banana Pie


I made this awesome pie for Derrick's Birthday.

It's pretty easy. No oven involved. Perfect for summer. It involves a fresh blueberry sauce, Banana pudding, and a raw crust of medjool dates, pecans, and brown sugar. Serve with fresh whipped cream.

We'll start on the crust. Easy peasy.
Just blend 2 cups of pecans, 5 dates, and 2 tablespoons together and press into an oiled pan. I think parchment paper would have worked well too.

Next make some vanilla pudding. I used this recipe and added 2 chopped bananas.
Finally, I cooked down a pint of blueberries with 2 tablespoons of brown sugar.

Serve with a scoop of whipped cream. I like to pour cream into a jar with a lid, and add sugar to taste. Then I shake the jar until it's whipped.

And you end up with awesomeness. It's almost healthy. Kind of.
Happy pie making...

Mulberry Wine, Beer, and Lamb Chops

Early July has come and gone, but I still remember the mulberries. I am still waiting to find out how the beer and wine will taste, but I have a good idea how it is going to turn out.

As it went, a few weeks ago, a few of my friends, my man, and I picked about 7 pounds of mulberries. Most from our yard, but a few in some areas where we were semi-trespassing. Oh well. We had a great time hunting for trees.

Mulberries are mostly sweet when ripe, with a little tang when they aren't as ripe. I love them. They're so juicy and pretty, and they stain your fingertips when you pick them. But I guess if you pick 7 pounds of anything, it's going to stain your fingers.

I guess I'll start with the wine. I made it with my friend Katy. We started out with a recipe from grape stomper and mixed it together with a few others to come up with this recipe:

4 lbs Mulberries
2lbs 7 oz Honey
1 Campden tablet
2 Quarts water

champagne yeast
1 tsp yeast nutrient

1 2 1/2 gallon bucket for fermentation

We boiled the honey in 2 Qts water for 15 minutes and brought it back down to 80 degrees. This didn't take nearly as long as I'm used to, so I was impressed.
Next we added the 4 lbs mulberries to the honey, smashed it all together, and added the campden tablet.
The campden tablet killed the wild yeast overnight. The next afternoon, I started the yeast in some yeast nutrient and water. And it grew. I added this to the berries.
And it got happy.
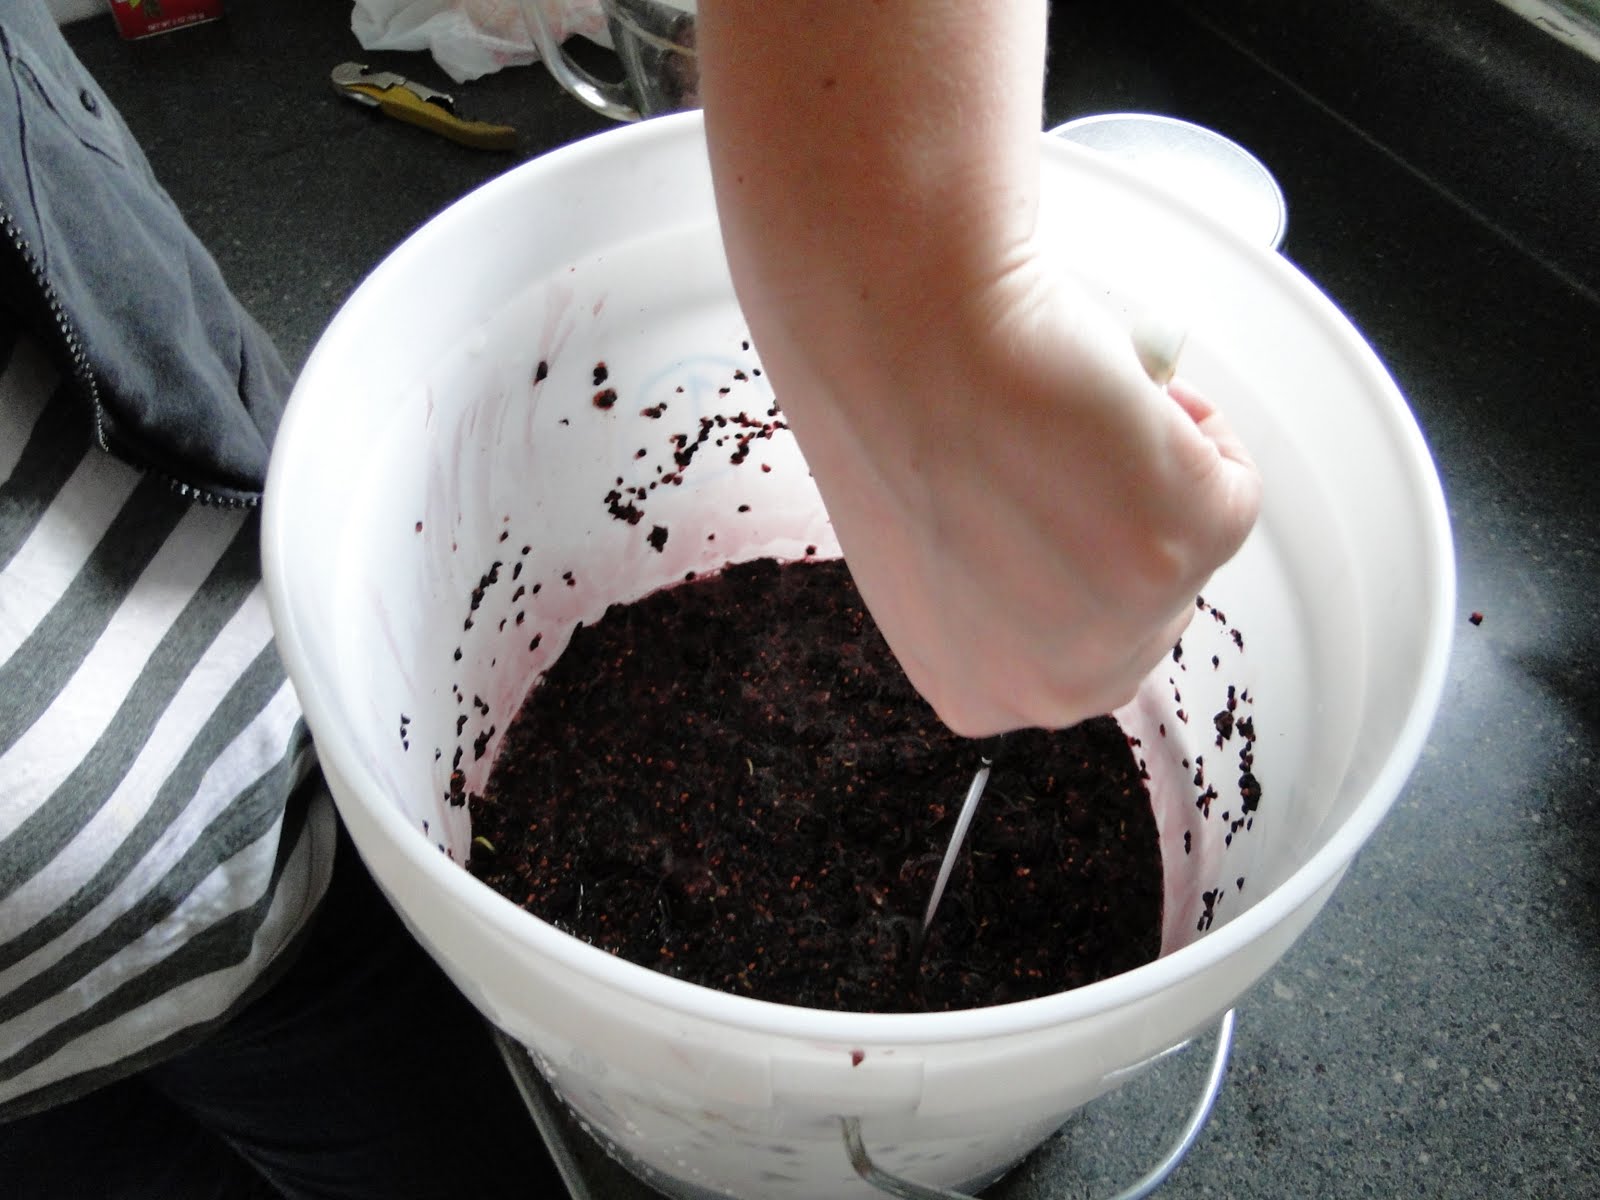
I was worried because it was really hot for a few days, but I continued to stir this for a week. After that we racked into a berry mush-less bucket.
We didn't have any wine specific presses to get out the excess wine, so I went old school. But obviously sanitized my hands. We've racked it once more since then.

The recipe for the beer we made is here. It has a pretty reddish tint, and tastes pretty good so far. I'm excited to find out. I call it the Mulberry Brown Sugar Porter. It finishes with a nice fruity, mulberry note. That will be done in a week! I don't know if I can wait that long.

Finally, to finish my mulberry adventure, I made mulberry marinated lamb chops. This was fantastic.

It starts out with:

2 lamb chops (mine were about a half a pound)
nice olive oil
Cabernet Sauvignon
rosemary
thyme
garlic
salt 'n pepper
mulberries

Most of my marinades are approximate, and I just add a little more of this or that until I get the taste I want. Mash the mulberries with the herbs and garlic and marinade lamb chops over night.

Cook until medium rare, and while the lamb is resting, deglaze the pan with the rest of the marinade until it cooks down a little. I served this with a little green salad, potatoes, some farmer's market kale cooked in chicken broth, and the pan sauce on top of the chops. And boy, was it good.


Happy mulberry hunting!

Sunday, July 10, 2011

Mulberries: An Ongoing Obsession


I feel like summer is in full swing when the garden is going crazy, I actually have a tan, and mulberries start turning the sidewalks and shoes of South Minneapolis a deep shade of purple. I don't think I've ever had a mulberry outside of the general Uptown area. I am aware that they exist elsewhere, but I haven't exactly wandered aimlessly through many other cities in search of mulberries.

Anywho, mulberries are wonderful. I have many blissful summer memories of Derrick losing track of me on a bike trip, only to find me at the last mulberry tree we passed. But for some reason I have never cooked with them.

This year I made had few fantastic forays with this fruit, including my new favorite homemade venture: alcohol. I started out my mulberry quest with beer. We brewed a Caramelized Brown Sugar Porter (Thanks hopville for the recipe tools!) and added mulberries to secondary. But I'll get to that later... when it's done. I'm hoping it's a little purple. Next, a friend and myself made mulberry wine. And finally, Lamb Chops in a Mulberry, Herb, and Cabernet sauce. I also hope to make a jam and a dye, but I'll have to hurry before they're all gone!

I'll let you in on these recipes soon! Happy Mulberry season!

Friday, June 17, 2011

Grilled Spinach Artichoke Dip

It's finally summer and the grilling commences. Now I'd like to start off by saying that this is not my normal artichoke dip. We'll have to go over that one another day, as I know some people would love that recipe too. That's not saying that this recipe isn't amazing. It is.

One ingredient I've been using a lot of lately is quark. It's kind of like a cross between ricotta and goat cheese, but it's made with cow milk. I bought it one day because I thought it was goat cheese, and I ended up liking it more! Plus it's cheaper! Goat cheese doesn't have much flavor to it, but Quark does. I've used it in salads, my boyfriend dips strawberries in it, and now, I've made a dip out of it.

I used basic and simple ingredients, so what made this dip really awesome was the preparation. I mixed together approximately 1 cup chopped spinach, 8 oz quark, 4 canned artichoke hearts, a clove of garlic, a sprinkle of feta and of Parmesan, and pinches of salt and pepper.

I mixed these all together and poured it into a greased and aluminum foil-lined mini cast iron skillet. Finally, I set a small piece of foil on top of the dip, to hopefully create a kind of convection effect.

Set this baby on the grill to let everything melt together and get that great smoky grilled flavor.

And just as equally important, I drizzled a mini-baguette with some oil and sprinkled on some thyme. Toward the end of my grillin', I tossed this on for a little less than a minute to toast it.
Oh yeah. Scoop some of this awesomeness up and slap it on some of that baguette. Do it.
If you want to mix in a little cream cheese too, it won't hurt anything.
There's the thyme toasted baguette, and my grilled garlic potatoes and mustard-vinaigrette pork chop. I spoil myself a lot.

Speaking of spoiling myself, I also tried out Flat Earth Brewing Co.'s Belgian-Style Pale Ale. First of all, I love the label. A Belgian Malinois holding a Belgian Waffle? Oh for cute! (I know I'm so cutesy and Minnesotan) ...
This is another Minnesotan Belgian beer, which I've noticed is becoming a trend. Harriet Brewing makes Belgian ales as well. I'm making a Rosemary Saison at the moment. But that's for another time. This amber colored pale ale has flowery hoppy flavors, a strong malty background, and a very light Belgian-y yeast taste, which is slightly banana and clove-y. It didn't pour any head at all, to my dismay, though the amber color was pretty.
And to quote the description on the bottle, it "finishes dry and leaves you thirsting for more"! I would agree. Flat Earth calls this a "session ale", which makes me want to look in to making one of these, but maybe with more Carapils malt to add to the head retention. I love local beer. Up next: Cygnus X-1 Porter and Angry Planet from my bomber sampler, which, by the way, I think is an amazing idea.

What a good night of grillin' and beer. Hope you enjoy it too.

Happy Grilling!

Monday, May 30, 2011

All natural vanilla brown sugar scrub

I love sugar scrubs. LOVE them. I have tried to to buy them online, but not only are they ridiculously expensive, they are also chalk full of preservatives and chemicals, not something I want to put on my skin! But I digress... Making your own sugar scrub at home is cheap and easy! All you need is sugar, oil, vitamin E, and some sort of extract for a great smell. The sugar exfoliates your skin, the oil and vitamin E hydrate and moisturize your skin, and the smell is just so gosh darn good.

After looking through many, many sugar scrub recipes I found that most recipes used a 1:2 ratio of oil to sugar, as well as vitamin E. When it comes to vitamin E, capsules seem to be the cheapest, though the little bottles of straight oil would be much easier to use. Stabbing 10 capsules with a knife and squeezing them out is a little tedious but I am really really stingy.

So it goes...
So simple with four ingredients. Olive oil, brown sugar, vanilla, and vitamin E. You can use other sugars, oils, or extracts, but the basic idea is the same. I also had a container to keep in the fridge, and a littler one to keep in the shower.
I used 1 cup of sugar to 1/2 cup of oil.
And I used 10 vitamin E capsules. Capsules are difficult to get open, as I previously stated. The easiest way I've found is to hold the against the counter and prick with a knife on the seam. Then I squeeze as much out as possible into the sugar/oil mixture.Oh yeah. And I bet it's tasty too. Just kidding.
Then I put it in my little container to put in the shower. Sweet.
The rest I put in the fridge. I labeled it to avoid any confusion.
As far as other natural beauty goes, I may try beer shampoo next? But that is for another day.
Happy scrubbing!

Saturday, April 23, 2011

Gardening Excursions of 2011: Thus far...

Spring is still on its way, and lots of things are happening lately! Between two jobs, just accepting another one, a funeral, Easter, family get togethers, brewing lots of beer, and biking, I'm a pretty busy gal! One gorgeous day a few weeks ago I managed to find enough time to prep my garden for the year. I did the usual: turning over and aerating the soil, adding fertilizer and compost, pulling out any weeds (yeah, I will definitely have to do THAT again...), and evening out the soil to make the bed look pretty.

That day, I went to Amelia's Flower and Garden Shoppe to pick up some new seed soil because my first experiment of the year didn't go very well. I tried putting my seeds in a new location because I thought they would get more sun in the upstairs bedroom, but there was not enough ventilation. Combined with bad seed soil that didn't drain well from Bachman's, and getting a little too wet, my seeds got moldy. I was not a happy camper. So Amelia's mixed me up a beautiful medley of sand, peat moss, and good soil which has made my new seedlings very happy. I also moved my setup to my previous location which seems to make them happier. At least it makes ME happier to see them whenever I walk to my bedroom.
Except I have to go by the litter boxes. Not my favorite thing. My marigolds, petunias, purple coneflowers, and green peppers don't want to germinate. What gives? My seedlings include: cherry tomato, brandywine tomato, eggplant, jalapeno, sweet pepper, zucchini, leaf lettuce, lettuce mix, spinach, swiss chard, petunias, marigolds, coneflowers, and basil.

My tomatoes sure are pretty! Anyways, the nice salesgirl at Amelia's suggested that I try planting my lettuce outside because it is really hardy. She recommended covering them with something, just in case. I figured I had an afternoon to kill, so why not try it? I didn't want to buy a bunch of stuff for my seedling cover, partially because I didn't have any money, but also because I could only see myself needing it until about May 15th. So I devised a plan to come up with my own jerry-rigged system using and re-using things around my house. The only thing I bought was duct tape. Why we did not have any duct tape is a question I cannot answer.

What I call my "seed tent" was made up as I went along. I used duct tape, Roundy's bags, string, bamboo grilling sticks, and wire hangers.This was before I knew I was using wire hangers to weigh down the sides of the tent.

I started out with a Roundy's bag. Actually, ten of them.
Chairman Bob's Seal of Approval for this project.
I cut the tops off of all of them to make squares.
Next I duct taped each square together. And since I'm a little OCD, all the Bobs had to go the same way.Next I straightened out two wire hangers and duct taped them to the ends for a little support and weight.Next I realized that the bamboo skewers needed something to be tied to. So I cut holes in the duct tape parts (for more security and durability) and looped some string into the hole. The skewers inside ended up acting like a skeleton for the whole tent, though to hold down the tent I just stuck skewers through the duct tape to secure it to the ground.
Next I added the last two bags to the end to close up the tent.
I found this entire project to be entirely amusing. I mean, who duct tapes plastic bags together? Apparently, I do.

Here it is in action. I planted Grandpa Admire's Lettuce, Mesclun Mix, Swiss Chard, Spinach, Leaf Lettuce, and a few other varieties under this tent on April 5th.
Mandi found this angle to be deceptive. It's really not taller than 6 inches. Or the width of a Roundy's bag. Rocks are weighing down the little flappies on the ends.

Most people I talked to about this project were worried that the seedlings would die from cold temperatures. I was skeptical as well, which is why I planted additional lettuce seedlings inside. After two (separate!) days of snow on the ground in April, and countless freezing nights, I was sure they were dead. But to my amazement, they're still with us!I laughed maniacally when I discovered them.
I plan on still covering them at night, but for today I'm going to let them have a little sunlight. If it comes out today.

I can't wait for gardening season! One of my favorite things to do is to bring my seedlings out on "field trips" to get them used to being outside. After being in the sunlight for the first time, they visibly change color! Soon it will be nice enough....

Until next time,
Happy Gardening!

Saturday, April 2, 2011

This is what I'm drinking...

I thought it would be fitting to review a bike inspired beer after a bicycle-centric day. Today I worked at the shop all day, and then followed the shop boys to a bike art show after chilling out in the parking lot. Me and a bunch of guys. Yup. Thus the beer of the day: Lakefront Brewery's Fixed Gear American Red Ale. Another great 22 ouncer from Lakefront. It pours a modest white head and has a beautiful red color, and leaves a little bit of lattice on the glass. This beer is really floral and a little malty in the nose. This great red ale has a medium body, very mild bitterness, and a long floraly finish, thanks to great amounts of dry-hopped Chinook and Cascade hops. This is a great early spring beer, the medium body is very filling and satisfying for the season. Eat, drink good beer, and be merry!